SCO solution: matrix
Software settings
The matrix app has its own hidden Settings and Configuration section, which will help you see the current setup information or troubleshoot most issues.
To access the Settings, you will need access to your Supervisor app. In the Supervisor app, go to Settings, then “Hardware”, and then to “matrix”, and then choose the option “Open matrix settings”. Finally, scan the Aztec code displayed with the matrix scanner.

Settings screen

Hardware section

Setup code
The Settings page on the matrix app has two main tabs: General and Configuration. Below you can see the main functionalities included in these two tabs.
Settings: Actions
This section is visible by default to all store employees who can access the settings with the Supervisor app. It includes general actions to help employees.
Re-print receipt: With this option, you can re-print any receipt for the most recent purchases in the store. Not only for the current SCO, but also for another one that may have run out of paper, for instance.
Out of order: This option makes the matrix device enable the Out-of-Order mode. Out of order means that the customers cannot use the SCO at this moment, and instead they will see a full screen saying “Out of order” and the LEDs will show red by default.
Reboot: This option makes the matrix device turn off and turn on again. This could be useful, for example, after changing some network settings.
App Version: The number displayed here shows the current matrix app version installed in the device. If there is any technical issue, please communicate this information if you contact shopreme Support.

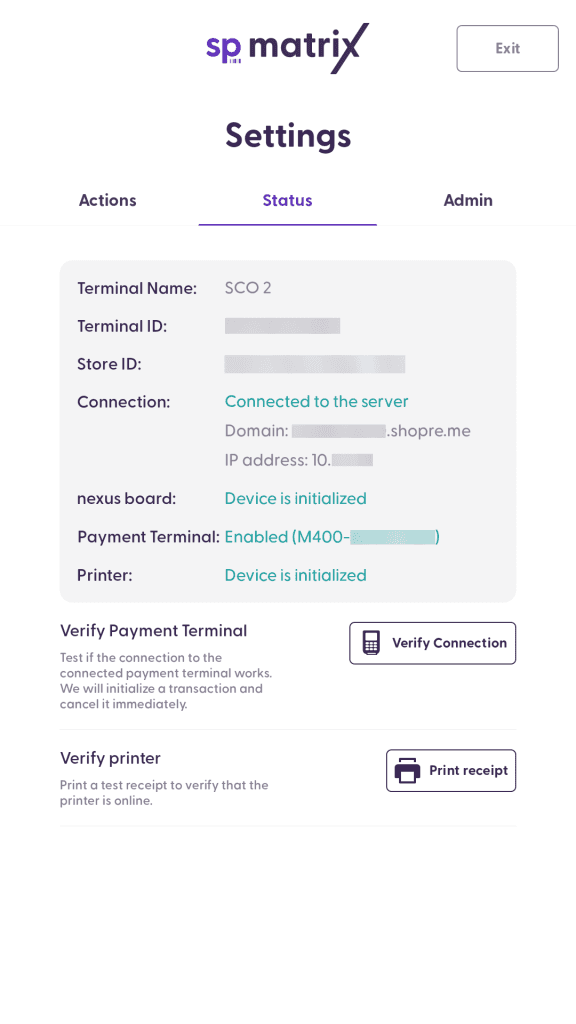
Settings: Status
The status tab is also visible by default to all employees and can help them have an overview of the state of the software and the hardware, as well as allow them to test some hardware peripherals. Here you have details about what each piece of information in this section:
The gray box includes general information about the device. Namely:
Terminal name: The display name for this device on the shopreme Middleware and Supervisor app.
Terminal ID: This is the serial number of the tablet, specifically. Please communicate this info if you need to contact shopreme support.
Store ID: This is the name of the store as it was registered in the shopreme Management Console and the Supervisor app.
Connection: “Connected to the server” means that the Ethernet connection is working and the app is connected to your server. The “Domain” is your store server.
Nexus Board: This shows the status of the connection between the tablet and the nexus board, which binds other key hardware parts. If this message is green, everything is connected and working as expected.
Payment Terminal: This is the PoS Terminal ID number, or Serial Number, as registered in your shopreme Management Console. If there is no Payment Terminal configured, this message will be “Disabled”.
Printer: This is the status of the printer connected to the matrix. If the printer is connected, initialized and ready to print, the status will be “Device is initialized”.
Verify Connection: Tap on this button to test the connection between your shopreme server and the Payment Terminal. A transaction will be initialized and cancelled automatically. There is no further action to take (no need to complete or cancel the purchase manually).
Verify Printer: This option prints a test receipt that contains text and different scan codes to verify that the rendering is working as expected.

Settings: Admin
This section is only available to employees who have been assigned Admin permission on the shopreme Management Console. It includes restricted settings, as well as some dangerous operations.
Factory Reset: This option unregisters your vector from your server, so then you can restart the Hardware and Software Setup process. This can be used in case the vector device is transferred from one store to another. Since each device is registered to specific stores, it is necessary to unregister it, to then complete the Hardware and Software setup again.
Sounds: This toggle enables or disables sounds for the matrix SCO. The effect is applied after rebooting the system.

Payment terminal (EFT) setup
The Software Setup process includes setting up the payment terminal as the last step. However, if the payment terminal is not ready for setting up yet, this step can be skipped. Then, the shopreme matrix will stay in “Out of order” and the steps on this page will be required to enable the SCO functionalities.
Remember that the matrix will be in “Out of order” mode if there is no Payment Terminal set up. The shopreme matrix cannot work without any PoS Terminal.
Before you start
Make sure your PoS Payment Terminal is connected to the cable coming out of the right-side of the matrix. It will turn on automatically and show that it is connected to the internet (This is shown by a small cloud icon on the top right corner of the PoS screen).
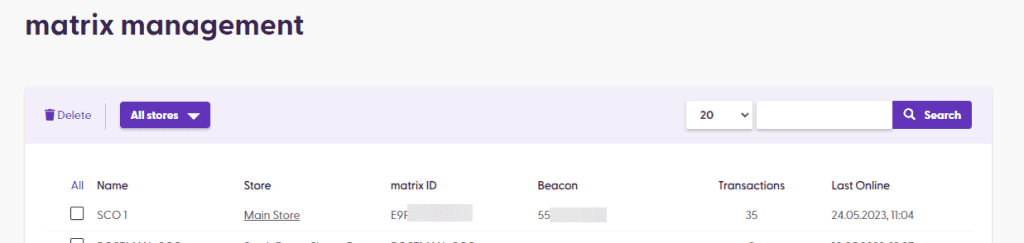
Then, on a separate device, please navigate to your shopreme Management Console, and then click on “matrix” on the left-hand menu, under “Hardware”:
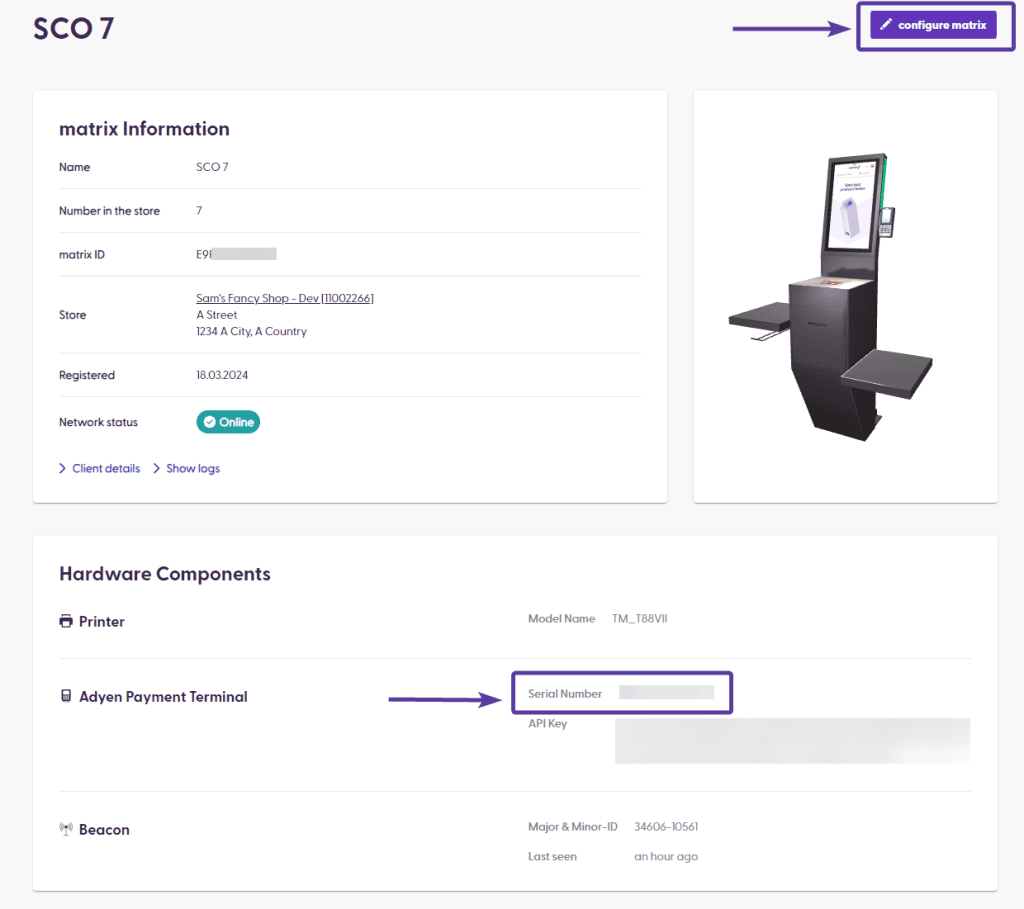
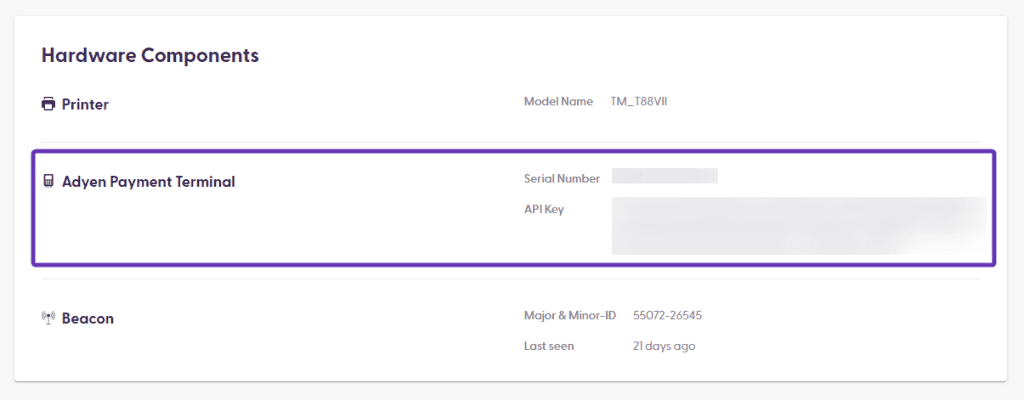
After a matrix is registered, it will appear in this section immediately. You can confirm that the Name and Terminal ID match the information visible in the Configuration Settings and that the Store is correct. You can also see that in the Add-ons column, the Payment Terminal icon is gray as it is not configured yet.
Click on the Terminal Name to see more details about this device and modify the Add-ons:
Adding a new POS terminal
To configure the new PoS Terminal, first check that there will be no Serial Number for the Payment Terminal yet. Then, click on “Configure matrix” on the top right corner:
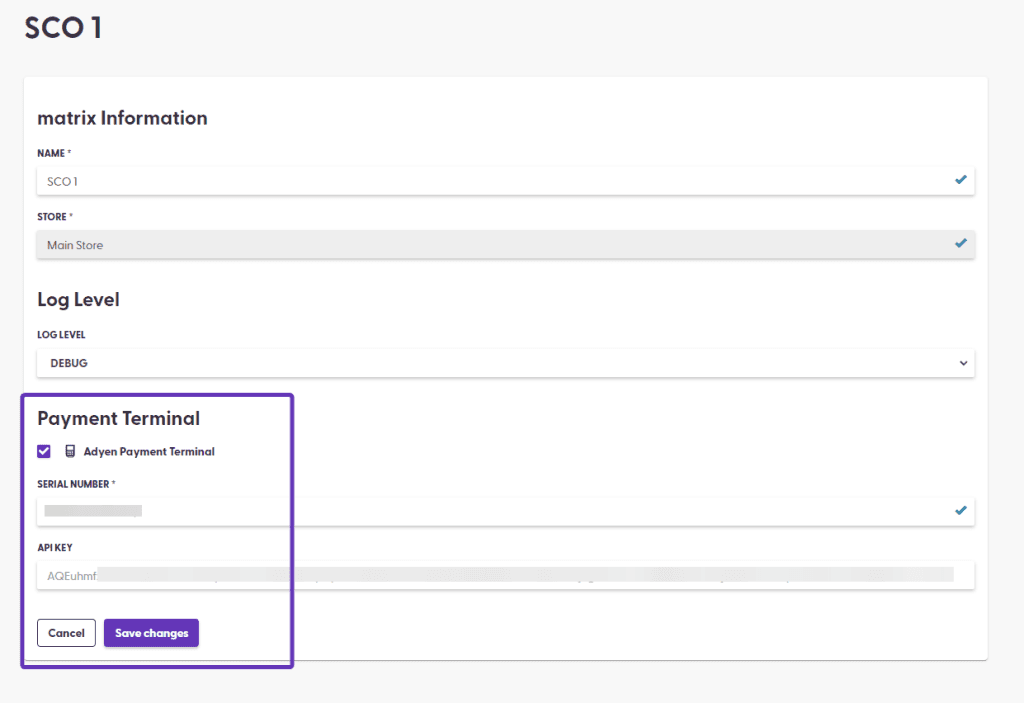
In the Edit Mode, click on the checkbox next to “Payment Terminal”. The name may vary depending on your Payment Service Provider (PSP). In this example, we used Adyen as PSP.
In the field below, enter the serial number or ID of your PoS Terminal.
The second field, the API key, can be set up as a default in your server, if the value is always the same. Otherwise, it needs to be manually entered. This key is provided by your PSP.
Please contact your shopreme Integration Consultant for any details on the PoS Terminal serial number, ID or API Key, and how to obtain this information.
Once the values have been modified, click on “Save changes” to continue:
After adding the new payment terminal, the matrix page will show that the Terminal is Enabled, along with the Serial Number and API key ending. Verify this information is correct!
Testing POS configuration
After configuring the PoS Terminal in the Management Console, go to your matrix to test the setup. If the matrix is currently showing the Settings page, please tap on “Exit” in the top right corner. Then, rescan the Aztec-code to reopen the Settings page on the matrix screen. This ensures that the matrix device will refresh and reload the new configuration you just modified in the Management Console.
Once you have reloaded the Settings page, check that the Payment Terminal appears as “Enabled” and the correct Serial Number is displayed between parentheses.
Then, tap on “Verify Connection” and wait a moment: The payment terminal will start a transaction for a small amount and will cancel it automatically within 5 seconds. Once that happens, you can confirm that your payment terminal is ready to be used by customers!

shopreme © 2025